
I have tried a few strategies to avoid bottling oxidation when packaging hoppy beers. Read along to find what I have found so far and help me rid the world of purple oxidized hazies!
Avoid Bottling Oxidation – Work in Progress
I was a little reluctant to write up this article. My goal is more to write about proven techniques, share tried and true recipes, or present the results of experiments. This one is more of a work in progress of observations that I have made while brewing other batches. I do think there is enough interesting information to share, so here goes.
Before we get started, I will point out that my measuring of oxidation is not scientific. I have no way to measure oxidation or oxygen levels. Experience, and many forum posts, have shown that oxidation will darken hoppy beers, often to a muddy purple color. Oxidation is also known to strip bright hop character and replace them with dull cardboard flavors.
My “measurements” come from visual clues. I am assuming that an oxidized beer will appear darker than a non-oxidized example and that more oxidation leads to a greater color change. This is probably not 100% accurate. I also do not know how much, or any, of this applies to other styles of beers. The two example beers in this article both use wheat, ranging from 10% to 33% of the bill.
Avoid Bottling Oxidation #1 – Pale Ale
Pale Ale Background
At the start of 2020 I was involved in a club organized wort share. I signed up to get one bucket of wort, but I ended up with an extra 5 gallon bucket with no specific plans. To put the extra wort to use, I used half to boost up the size of my main batch (a Quad that ended up wonderful!), and I made a Pale Ale with the other half.
Since this was not planned, and my focus was on the Quad, I did not take the best notes. I think I added more hops late into the boil and the dry hop than I planned. As I recall, the Pale Ale got a 50/50 mix of Cascade and Amarillo as late boil, whirlpool and dry hop additions (probably with some Columbus as a bittering charge). The beer itself was not the greatest, but that is not the point.
At some point before bottling day, there was a fairly interesting thread on Homebrew Talk titled “Limiting oxidation: effect of purging headspace O2 in a bottle conditioned IPA.” The thread has a number of pictures of bottled hoppy beers with different strategies to avoid bottling oxidation. It is worth reading.
This inspired me to purge the headspace of 4 bottles of my Pale Ale. I essentially just gave a short blast of CO2 from my tank using a small hose attached to my regulator. My gut feeling was that this simple step would not make any difference. I had bottled beers in the past and they seemed fine.
Pale Ale Results
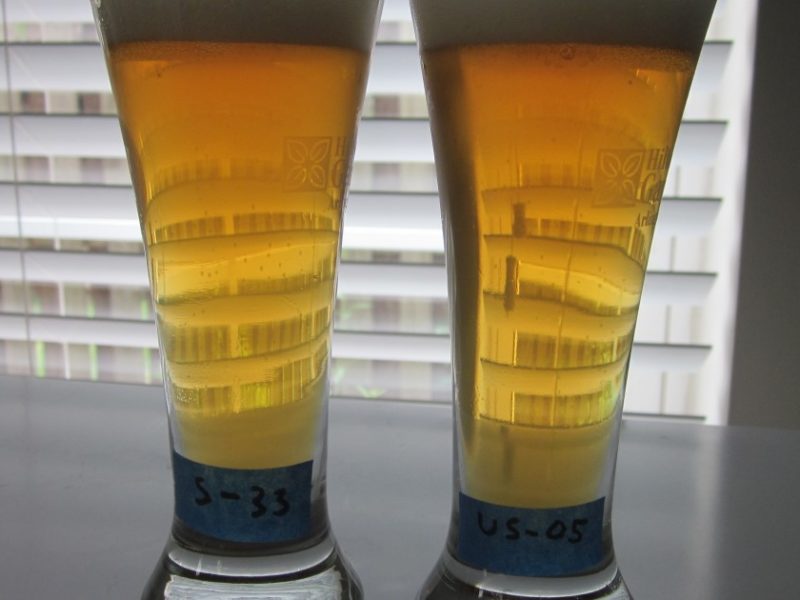
The difference in the color was shocking to me. If you could not guess, the purged example is on the right.
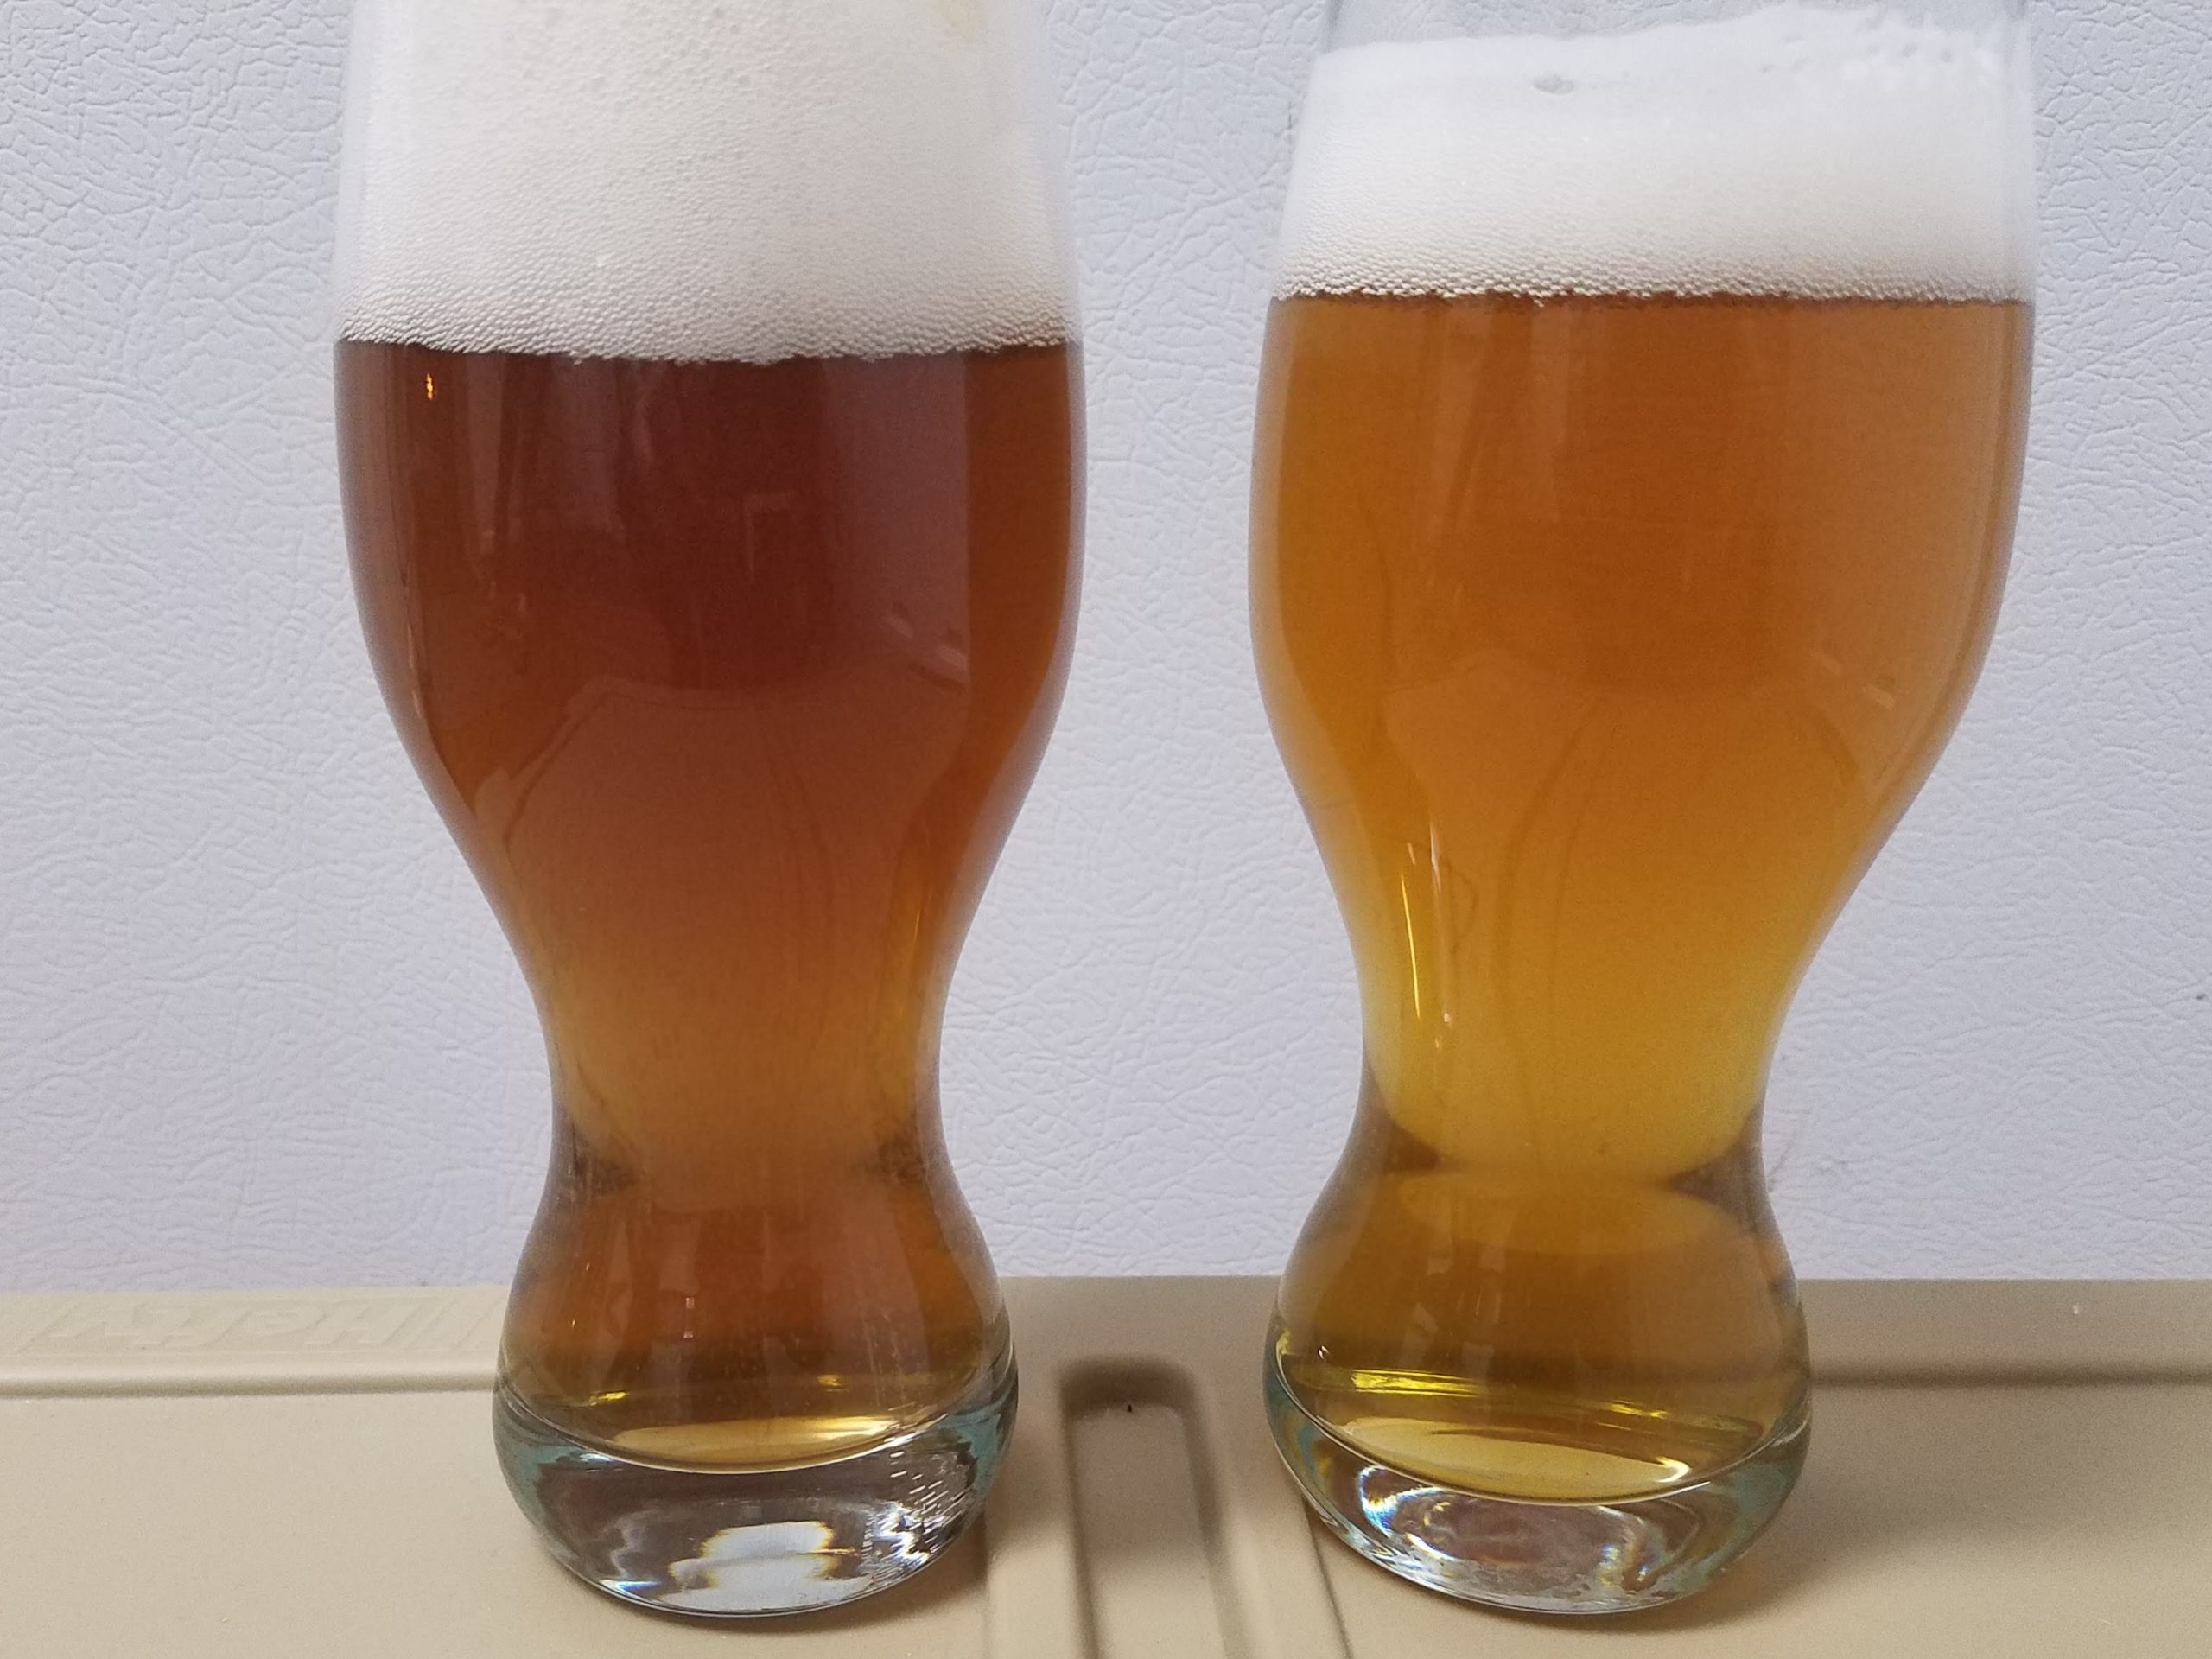
That said, the taste of these beers was not dramatically different each time I sampled them. I set aside two bottles and tried them 1 year after bottling. In a triangle test while blindfolded, I was not able to pick out the odd beer out. The beer was a bit too bitter. Floral aroma with citrus pith flavors dominated both versions. Neither beer exhibited bright hop characters, even when young. It could be that both were oxidized, but only the non-purged one had enough oxidation to cause the darkening.
In any case, this simple test put me on the path to thinking:
- Yeast does not fully consume all the oxygen in a bottle headspace.
- Likely all my bottled beers had some oxidation, even if it was not that noticeable.
- Purging the headspace is something I should do for all my bottled beers.
This batch of beer was all bottled in 0.3L flip top bottles. As I write this article, I am curious if using bottles with oxygen absorbing bottle caps would have made a difference. Something for a future investigation I guess.
Avoid Bottling Oxidation #2 – Hazy Hop Sampler
Making the Hazy Hop Sampler
I am a fan of making small investigative batches. I have equipment that I feel works for preventing oxygen exposure in my 2.5-gallon batches and I can close transfer them to a keg for packaging. On the 1-gallon batch size, bottling is currently my only real option. While I have not been confident that I could successfully bottle a heavily hopped beer like an NEIPA or a Hazy Pale Ale, at least my one data point with the Pale Ale gave me some confidence. Maybe I could avoid bottling oxidation.
I brewed a pair of 1-gallon batches of what I call a Hazy Hop Sampler. They are extract based beers made with 50/50 Pilsen DME and Wheat DME. No boil with 1 oz of hops added in a 180F whirlpool and 1 oz added as a dry hop addition. One batch got Idaho-7 and the other got Vic Secret. The top goal here was just to evaluate the hops and put my 2 oz packages to use.
When I added the dry hops. I also added a small amount of a crushed campden tablet equal to about 15% of a tablet. The beers were cold crashed with a mylar balloon device to prevent suck back.
Bottling the Hazy Hop Sampler
I bottled these beers directly from the fermenter using a bottling wand with sugar added directly to the bottle. For the majority of the bottles, I just purged the headspace like I did with the Pale Ale. I also bottled one of the Idaho-7 beers in a clear bottle to better observe color changes. None of the bottles were purged before filling. The Idaho-7 beer in the clear bottle was the only one capped with an oxygen absorbing cap. All the others were either in swing top bottles or used plastic twist caps.
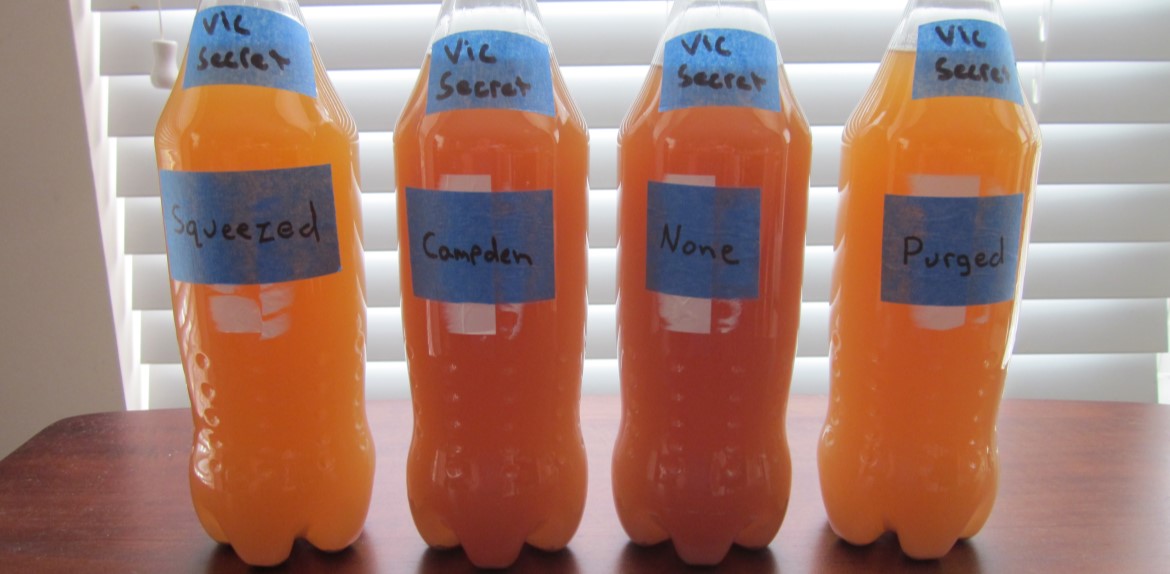
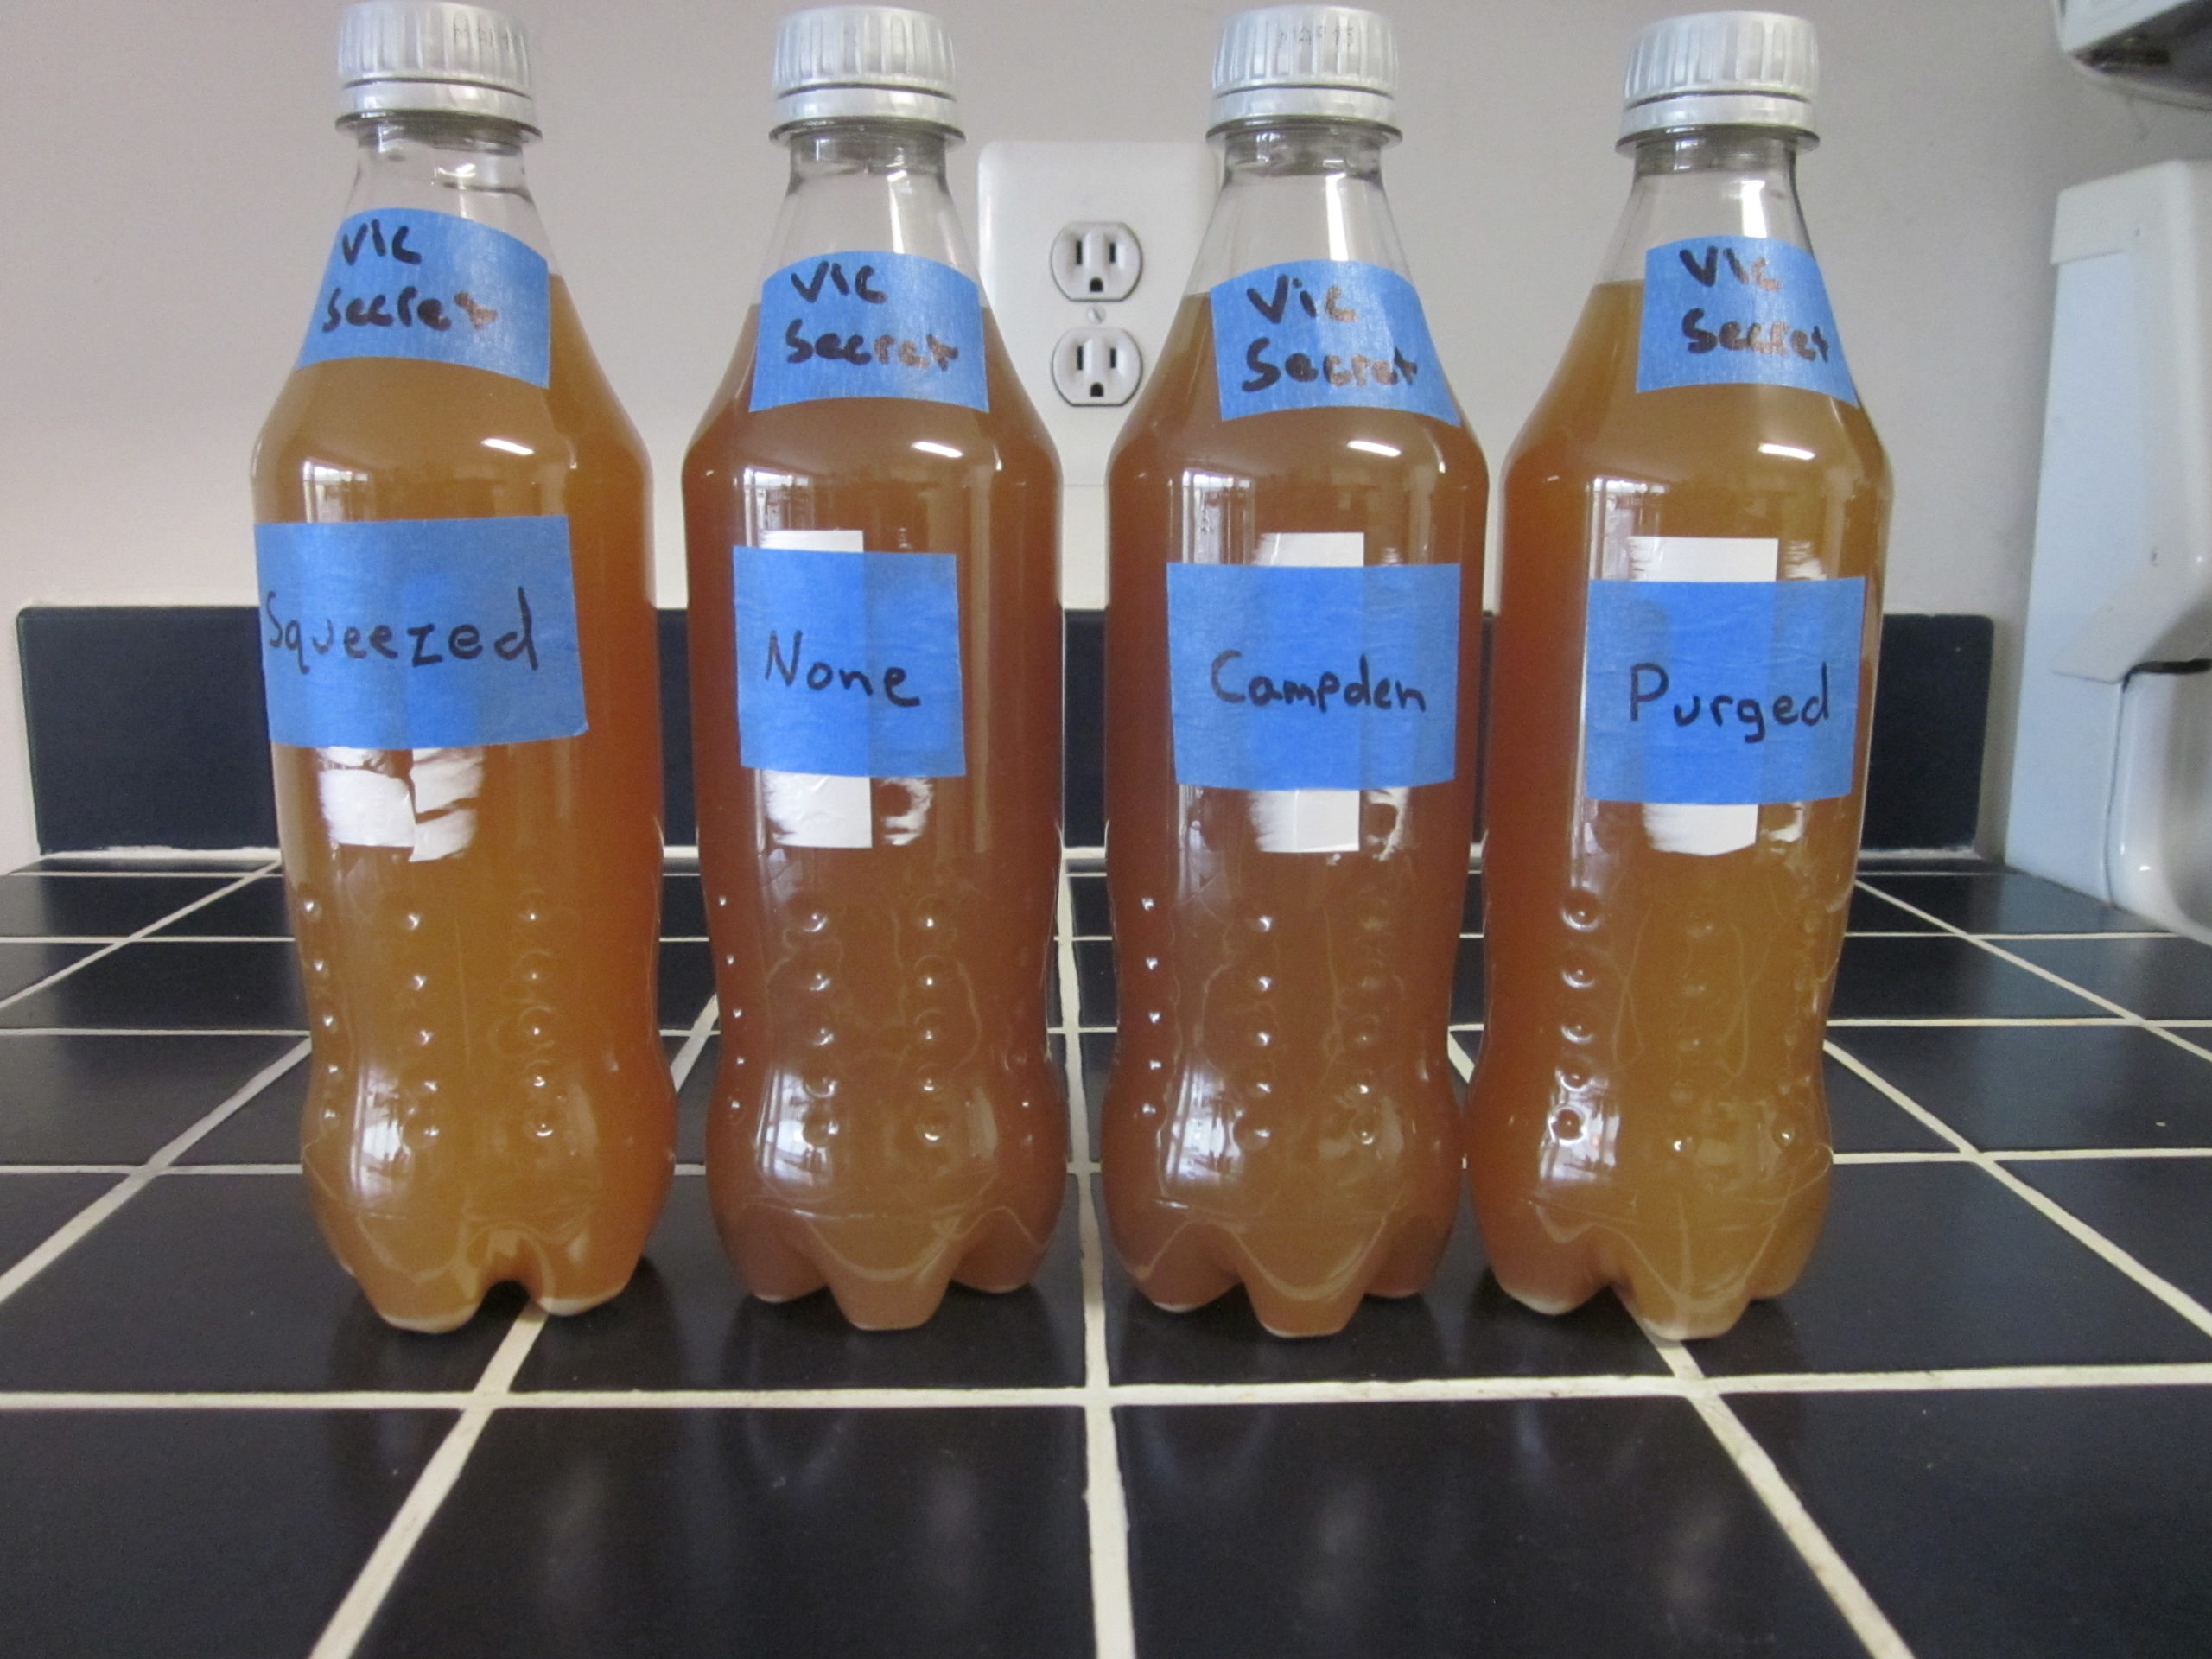
I decided to fill four clear PET bottles from the Vic Secret batch. I used cleaned Sprite Zero bottles. These four bottles got the following treatment (listed in the left to right order of the pictures).
- Squeezed: This bottled was squeezed just before capping to remove the air from the headspace.
- Campden: This bottle got a small amount of a crushed campden tablet at bottling. The amount was small enough that I did not have a means to measure how much was added.
- None: This one was just filled following what was my standard bottling process. The beer was filled to the rim, and the headspace is the amount left after removing the bottling wand.
- Purged: This is the same process used for the prior Pale Ale and the other bottles. I simply ran a gentle stream of CO2 into the headspace before capping.
Hazy Hop Sampler Pictures
Note that I struggled to get accurate and consistent pictures using different locations and lighting. I would not judge too much from comparing one picture to another, but more between the bottles in the same picture.
Bottling Day (5/16/2021)
The lighting of this picture gives the beers more of a grey look than in person, but at this point the beers all had a pleasant light golden color. Note the lack of any headspace in the “Squeezed” example.
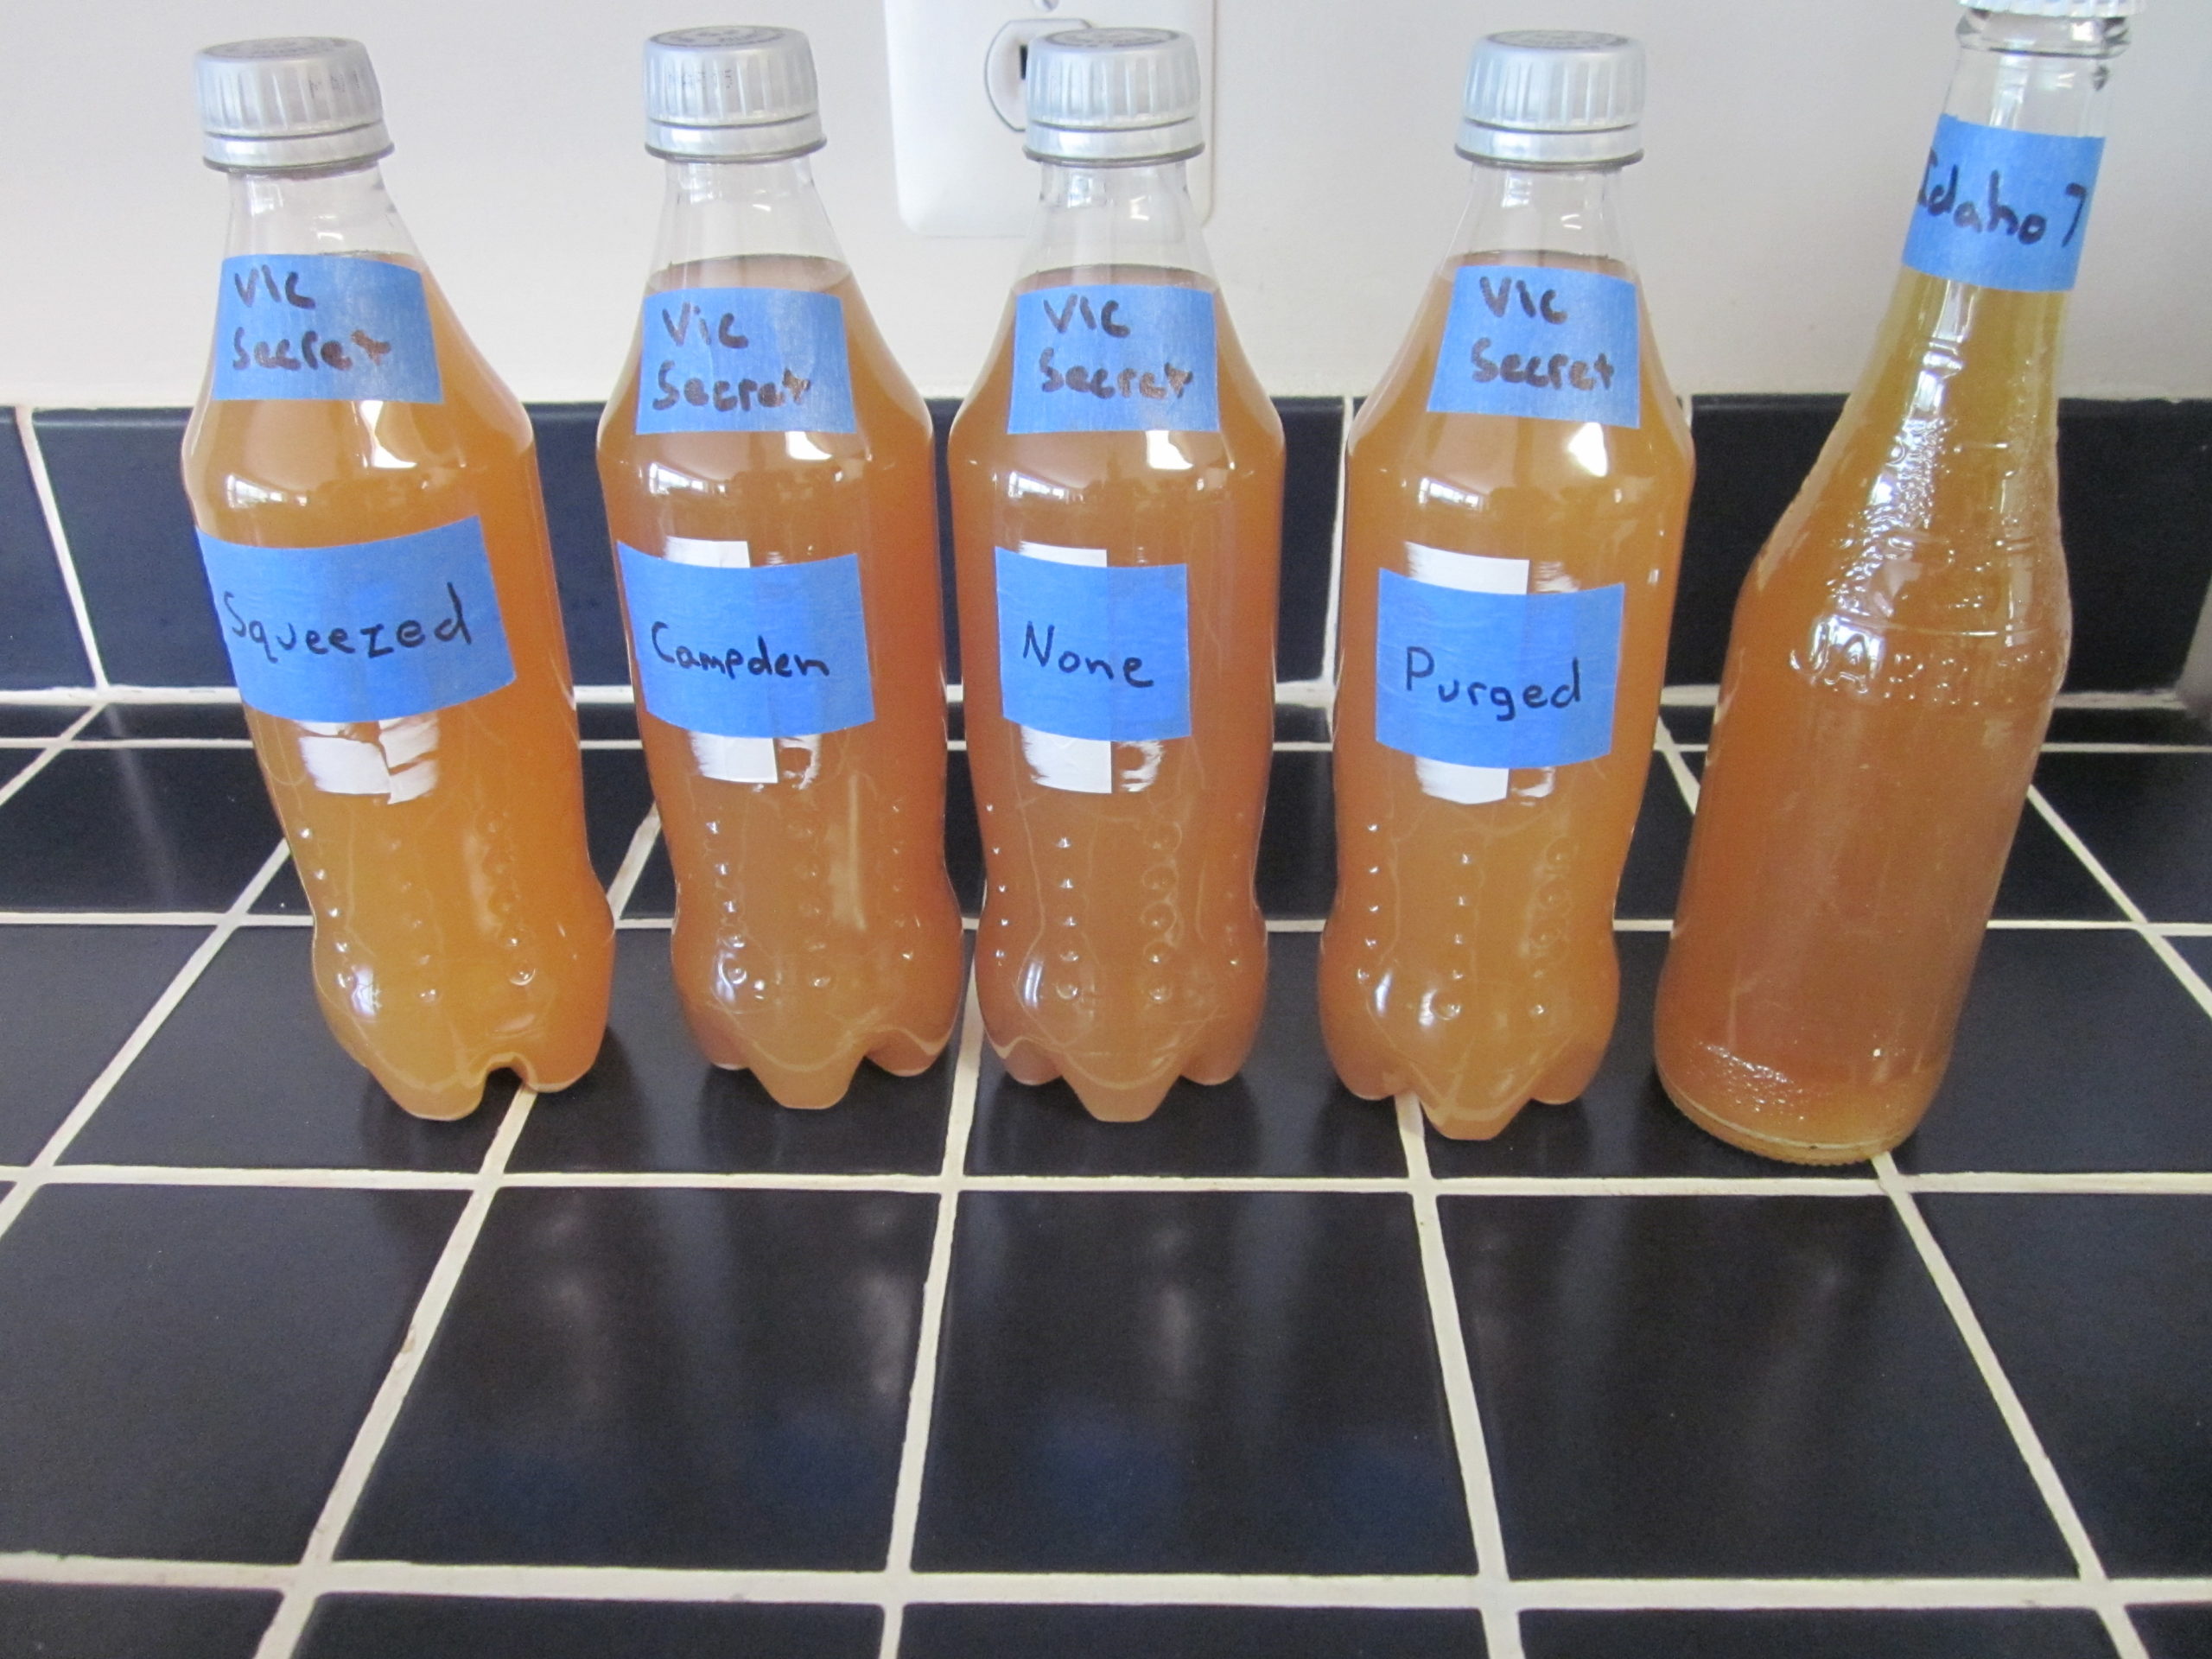
Day 5 (5/21/2021)
Even at just 5 days into bottling, there is already a slight change in color. The “Campden” and “None” bottles are taking on a slightly darker tone. I included the one Idaho-7 bottle that used the glass bottle with the oxygen absorbing cap in this picture. Given the different material and size of the bottle, it was hard to tell if this bottle was any different than the “Squeezed” or “Purged” bottles.
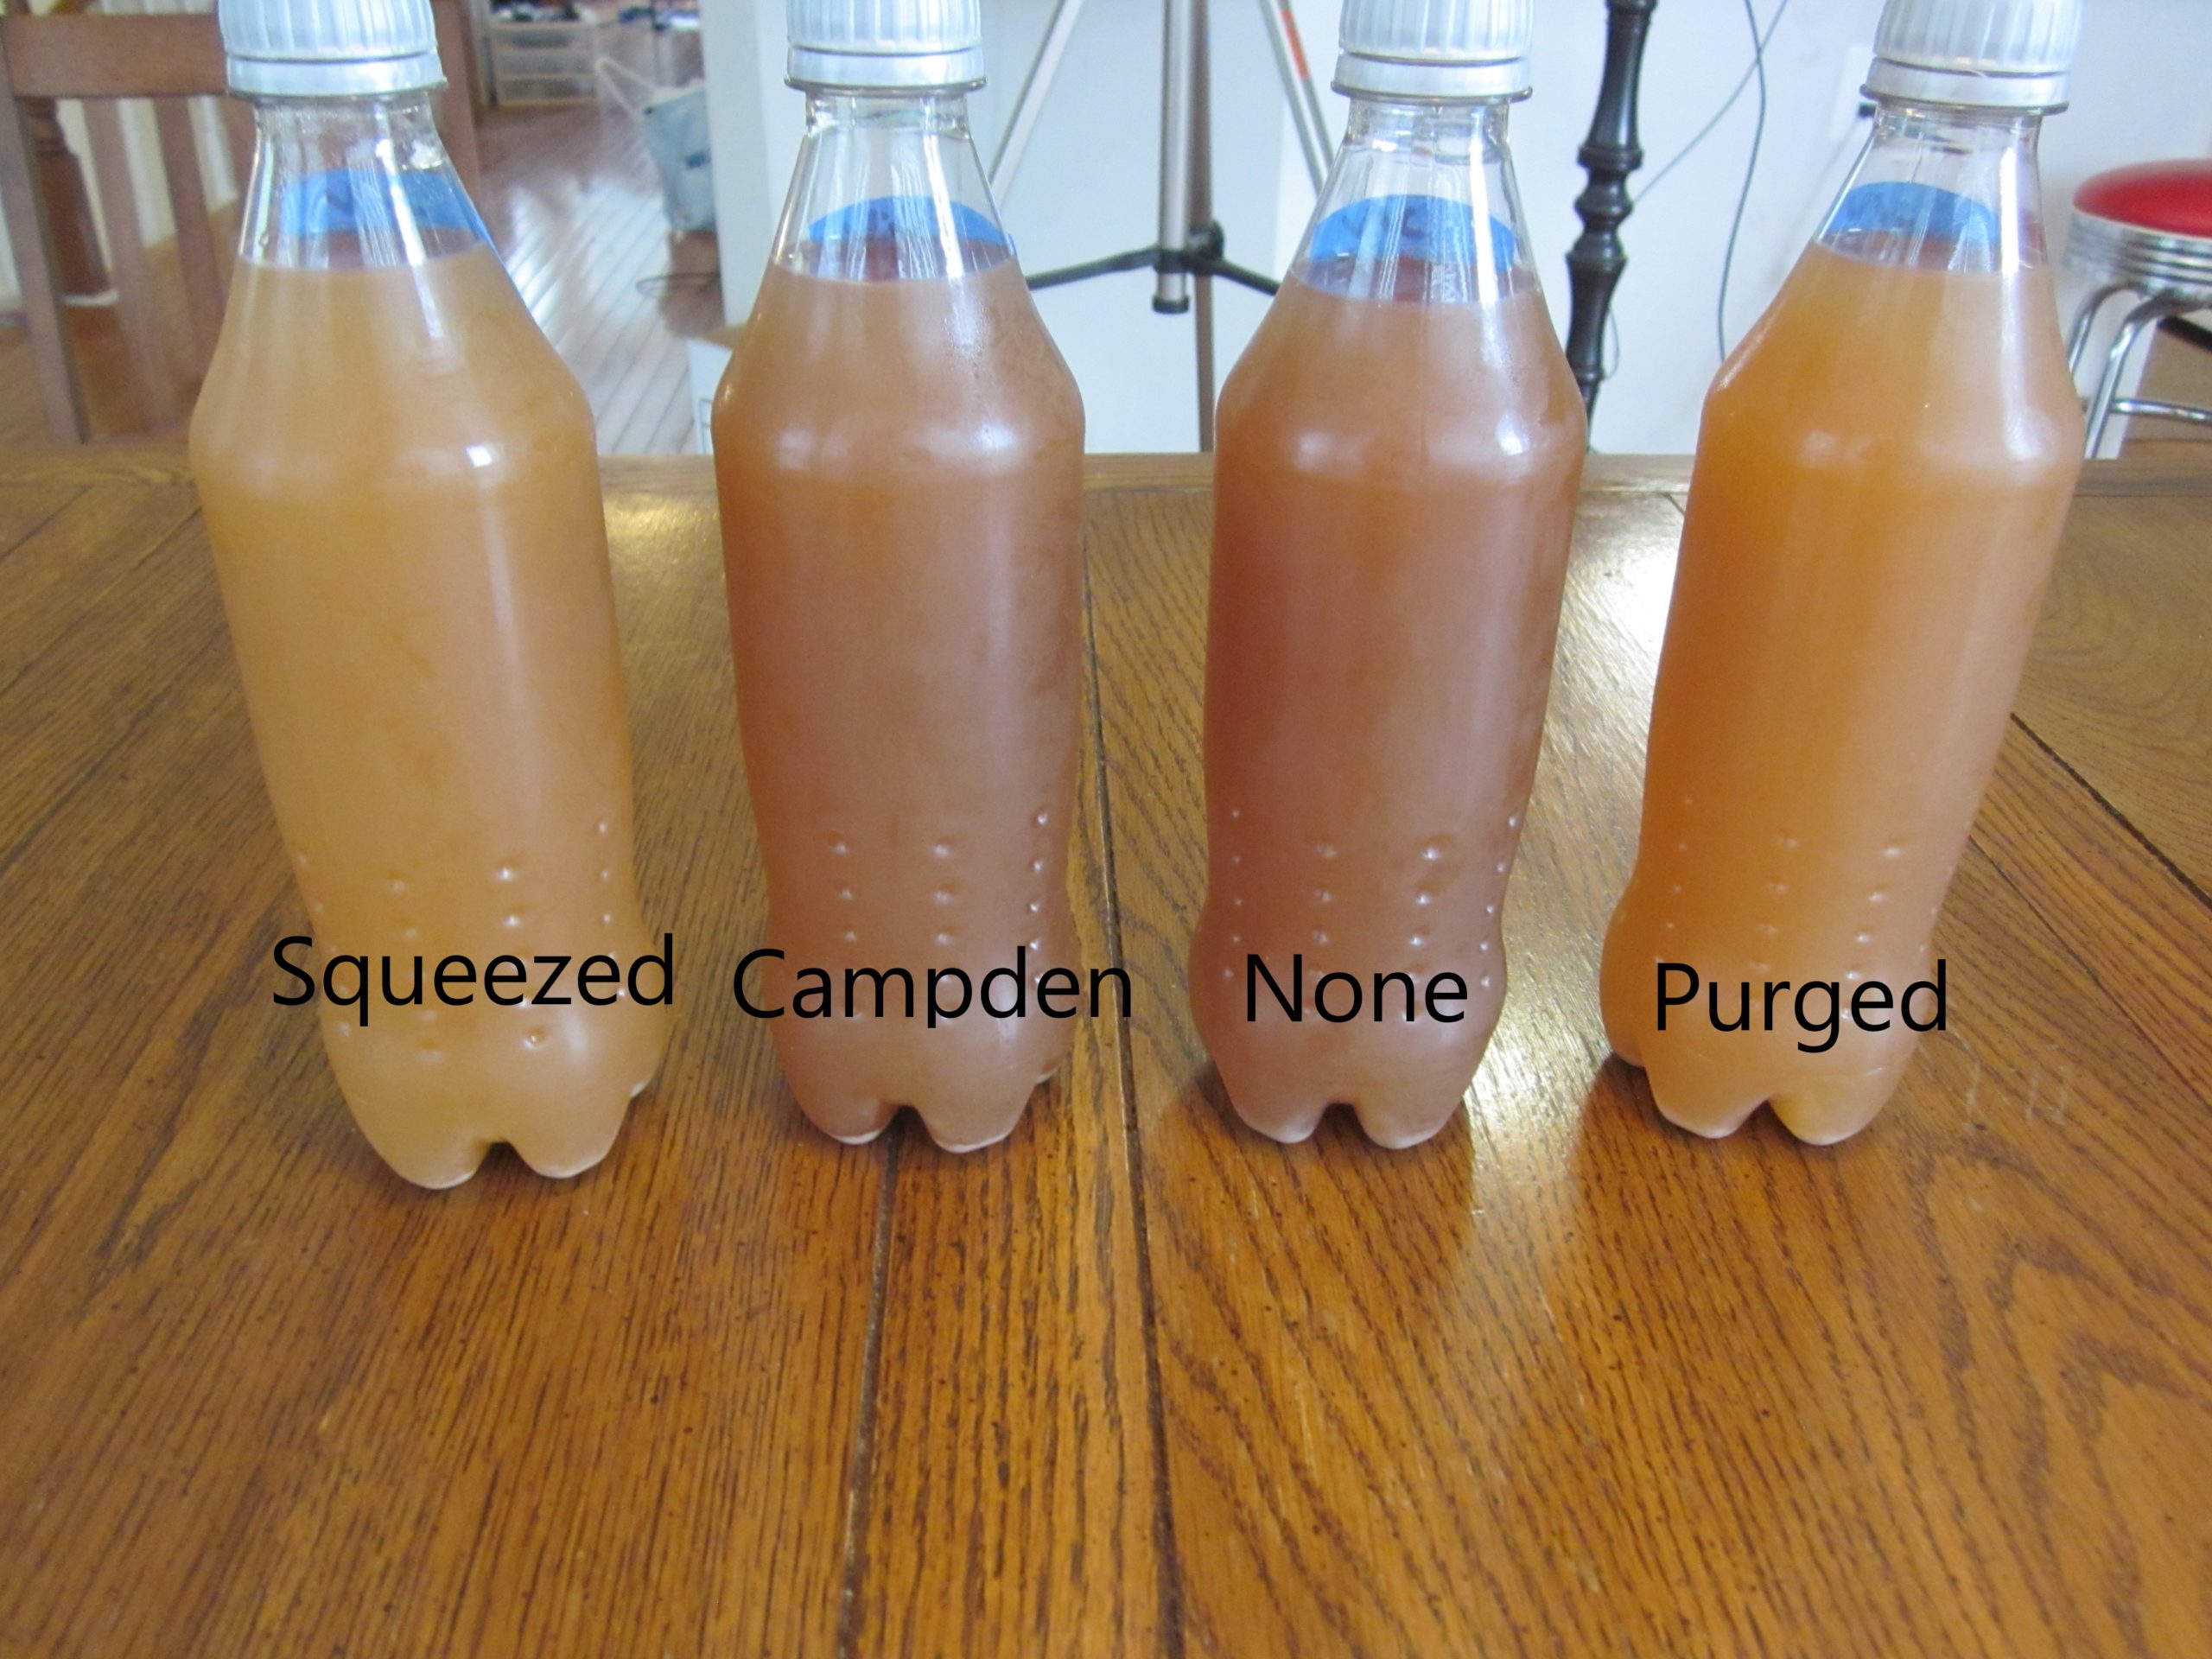
Day 10 (5/26/2021)
At day 10 the difference in color had increased with the “Campden” and “None” examples looking darker than the “Squeezed” or “Purged” examples. The coloring of this picture seems a bit off, but they all may have darkened a bit due to oxidation or just appearance as some yeast settled out. Note that by mistake, I swapped the order of the “None” and “Campden” bottles in this picture.
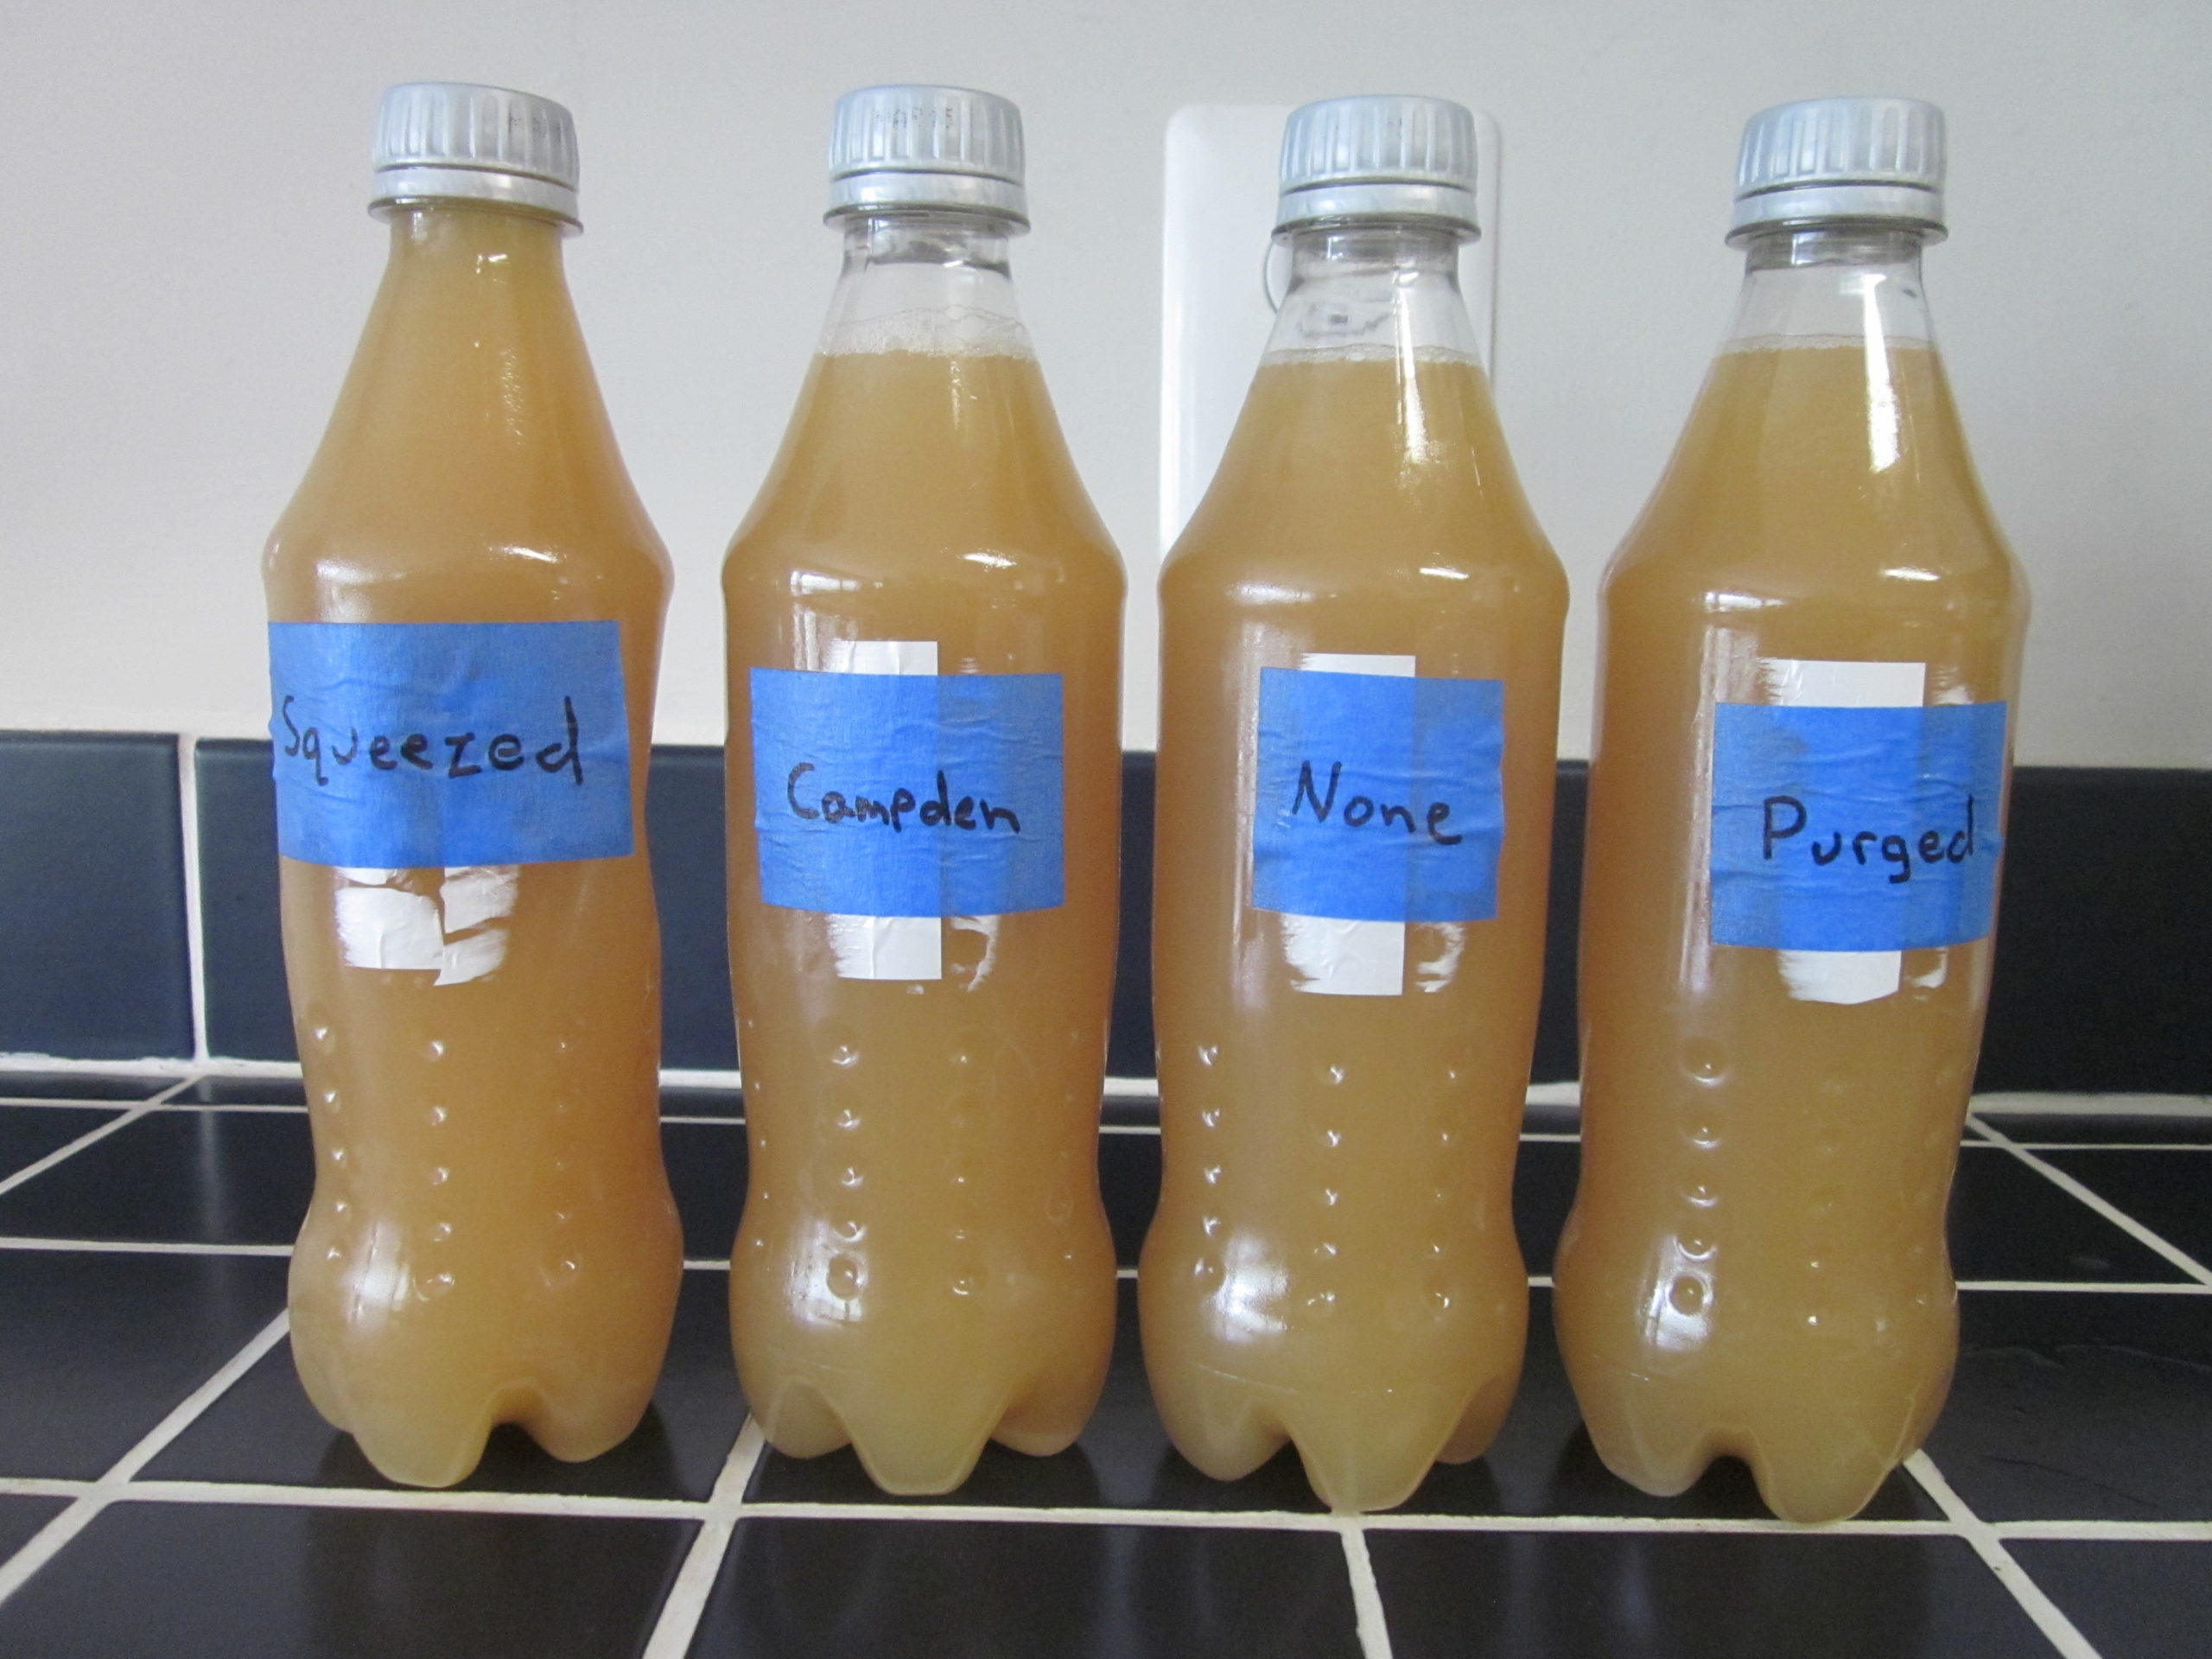
Tasting Day (6/12/2021)
At around 4 weeks after bottling, I opened up all 4 bottles for a tasting. This picture from the back was the one that most accurately shows the colors of the beer. I mirrored the picture so the order matched the pictures above.
To my eyes, the color of the “Campden” and “None” versions were identical. They both displayed a significant amount of darkening. On the other hand, the “Squeezed” or “Purged” bottles were both a fairly attractive light golden color that was very similar to how they looked on bottling day. In some light (including this picture) the “Squeezed” beer looked just a touch lighter in color than the “Purged” beer, but it was very slight.
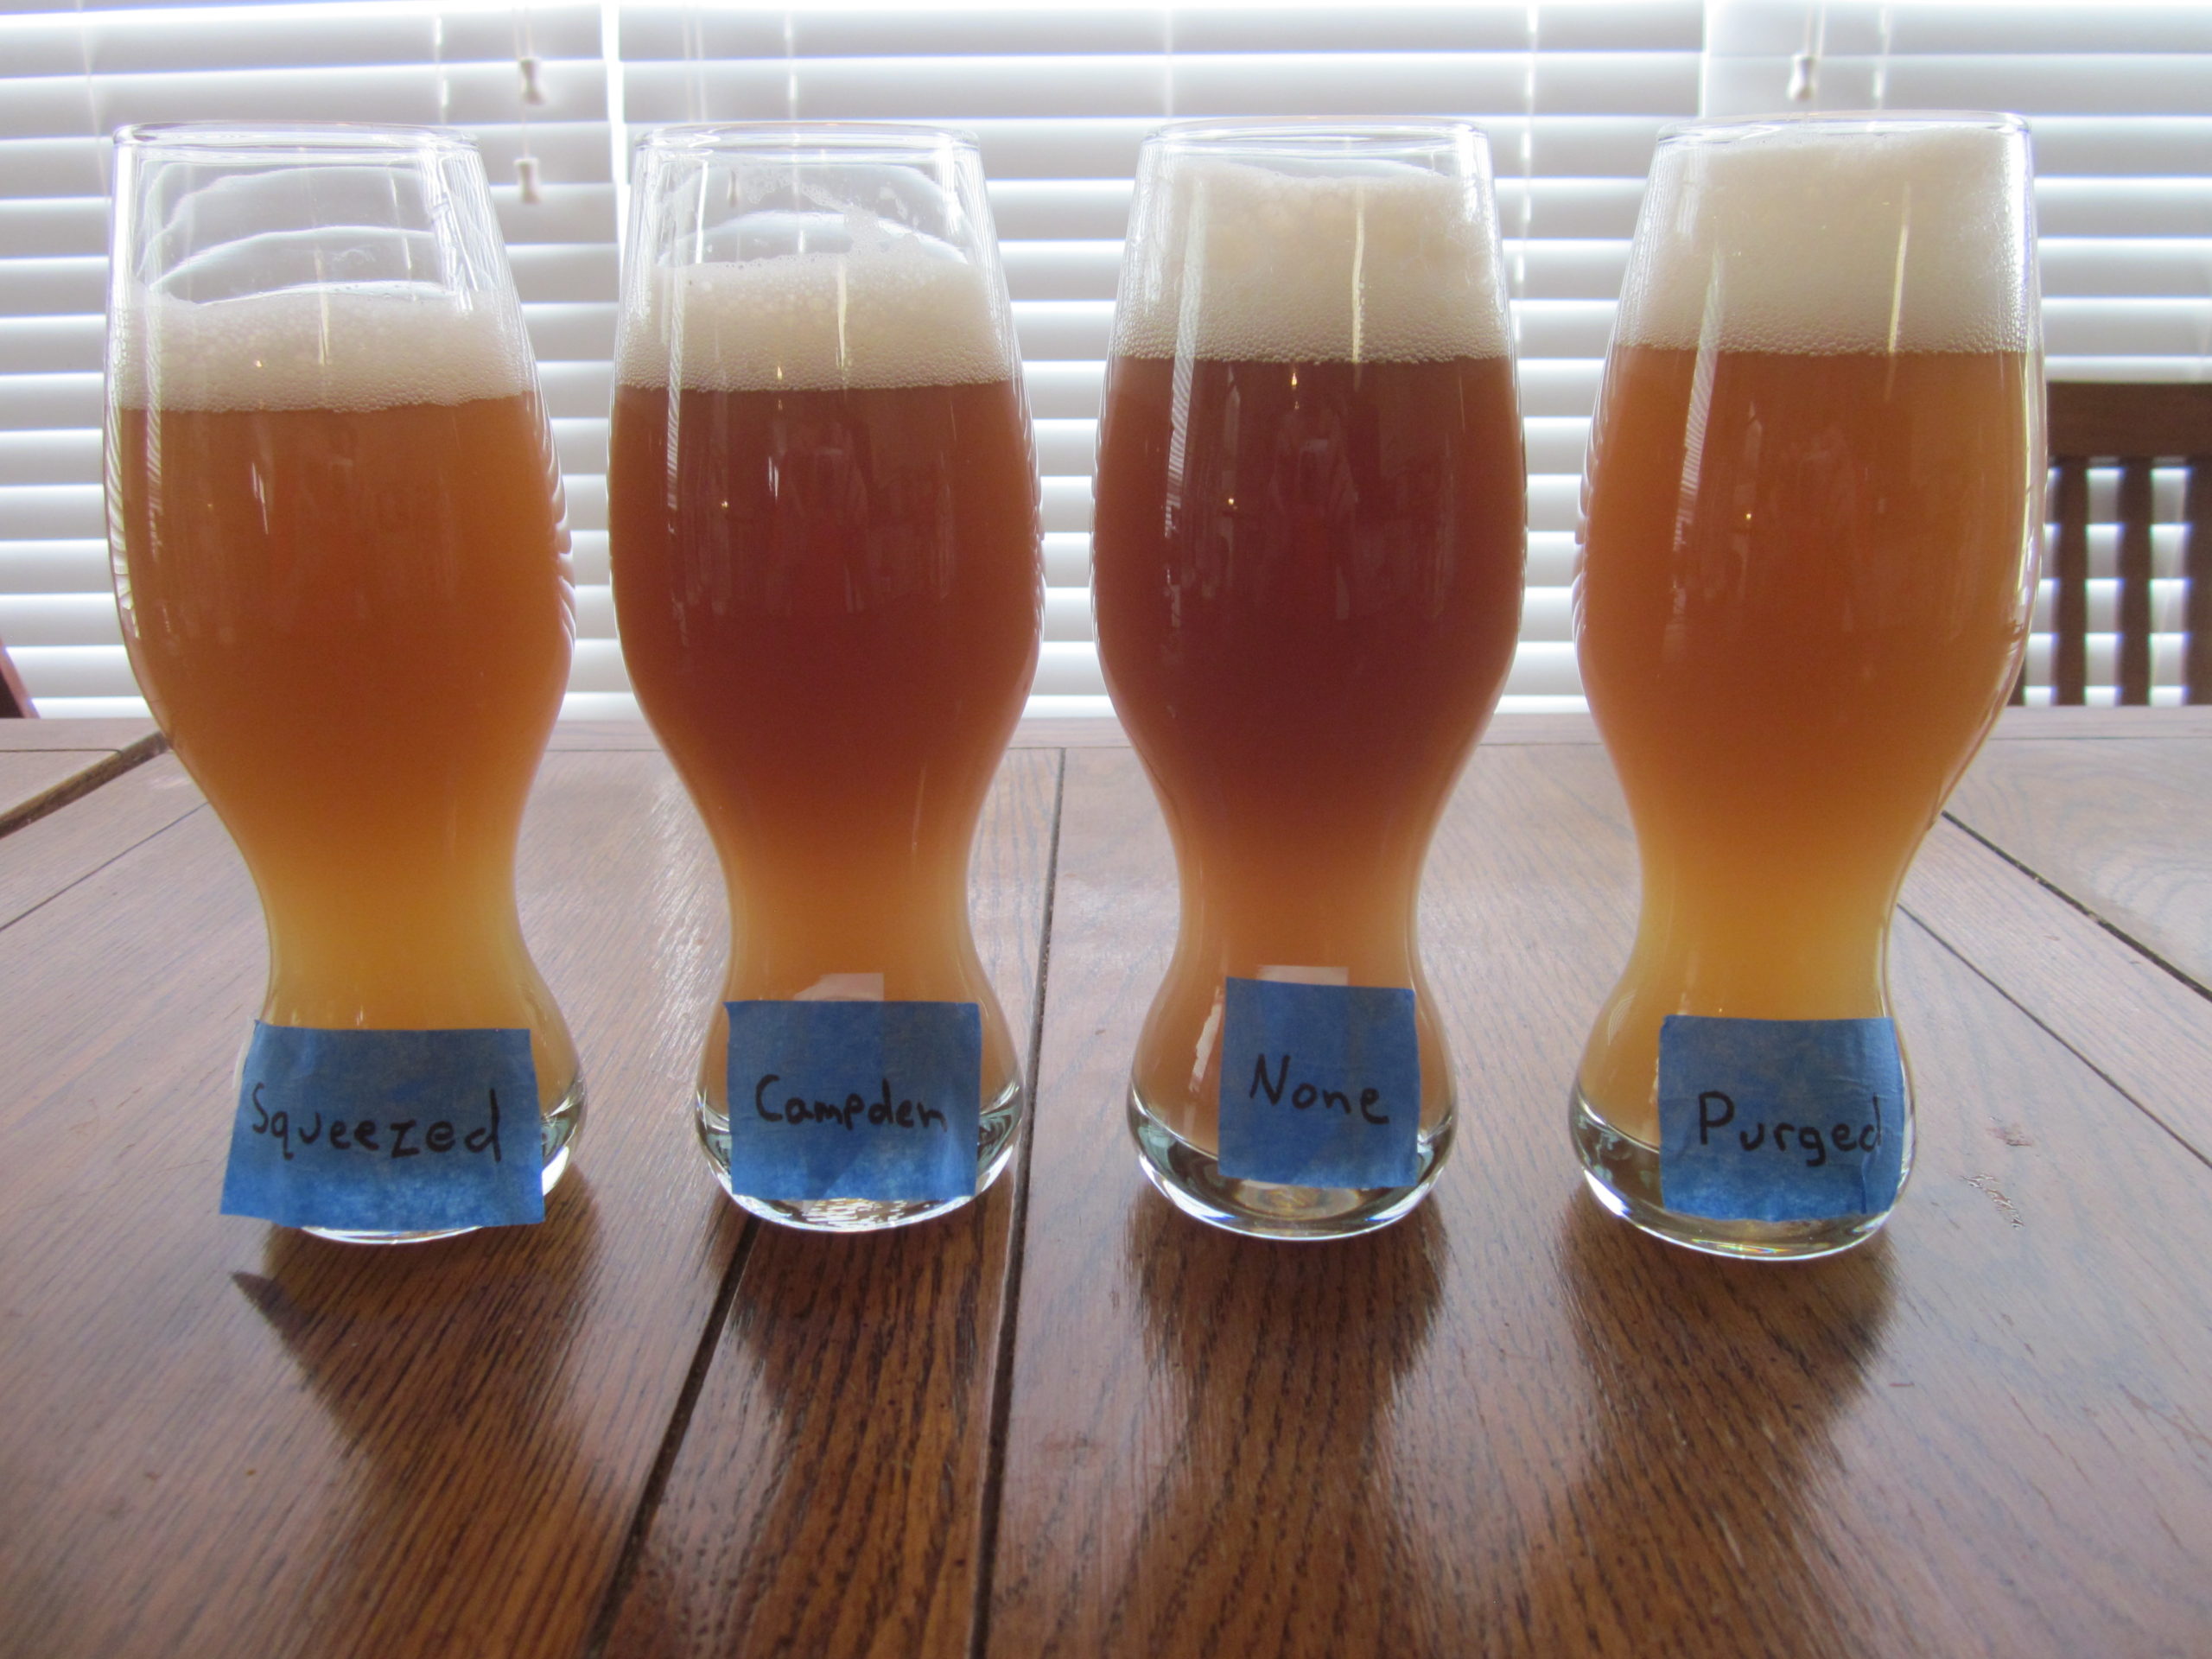
In glasses, the appearance and differences were similar. While the “Squeezed” and “Purged” examples might not have the straw color that I like in many commercial NEIPA beers, they were a fairly attractive golden color. And while the “Campden” and “None” bottles were not full on purple-mud, they were leaning that direction.
Hazy Hop Sampler Tasting Evaluation
I did film my tasting session. I am not sure if it is exciting or educational enough for me to ever put together a video to push up to YouTube. This tasting was fairly informal. The beers were poured into clear glasses and I knew which example I was sampling. Clearly biases impacted my perceptions, but there were differences.
Squeezed (1st Place)
The bottle where I squeezed out all the headspace was the highest quality sample. Of all the bottles, this one had the brightest tropical flavor notes. Maybe a hint of a pineapple, along with some herbal, pine and dank hop flavors. As seen above, this bottle retained a fairly attractive golden color.
Take Away: This appears to be a fairly viable option for reducing oxidation in bottle beers. It makes sense as this process can effectively remove 99% of the oxygen in the headspace. The downside is that it requires the use of a squeezable bottle while most people bottle in glass bottles.
Purged (2nd Place)
The bottle with the headspace purged with a blast of CO2 was a very close second. I am confident that I could not tell this apart from the “Squeezed” example in a triangle test. This example did seem to have just a touch of an oxidized character that muted the hop character just a little.
Take Away: Two simple tests have shown that purging the headspace of bottles with CO2 is effective at reducing the impact of oxidation. This test hints that maybe it will not completely eliminate the impact. It is a method that I have been using lately for all my bottled beers. A downside is that this method required a source of CO2. Many people bottling do not have a tank of CO2 around.
None (4th Place)
I am jumping ahead to the last place beer. Visually, this beer clearly looked oxidized. The color was significantly darker and leaned toward a muddy brown appearance. The bright hop flavors were muted in this example and replaced with the slightly sweet, caramel-like flavors that I associate with oxidized or poorly aged beers. This beer also had a bit of a bitter character. I felt like the hop aromas of this beer was similar to the others.
Take Away: I am more convinced that leaving the “standard” amount of headspace in a bottle of beer leaves enough oxygen to cause oxidation. While this impact is much more apparent in hoppy beers, I worry that this process may cause subtle oxidation issues with all styles of beers.
Campden (3rd Place)
While the beer treated with a small amount of a crushed campden tablet looked visually identical to the control “None” example, I did feel like it had just a touch more of the bright hop flavors. That said, the hop flavors were not nearly as clean as the “Squeezed” and “Purged” examples.
Take Away: Plenty of people claim to use campden tablets (or potassium/sodium metabisulfite) as an anti-oxidant to prevent or reduce oxidation. My test shows that there might have been a minor impact. Given my lack of a controlled dosing rate, I am willing to discount these results. It is also possible that a small campden addition is just not enough to overcome a full headspace of air, but would be effective at cleaning up a small amount of oxygen.
Suggestions to Avoid Bottling Oxidation
The first step is to reduce cold side oxidation in steps prior to packaging. If you are transferring your beer to a secondary or repeatedly taking the lid off your fermenter for dry hopping or gravity readings, then you already have issues. The exact areas to focus on will vary based on your equipment and process.
One suggestion to avoid bottling oxidation is to keg your beers. Well, duh! If you really enjoy making NEIPAs but think you don’t have room or money for a kegging system, you might want to rethink that decision.
When you do find that the need to bottle hoppy beers, the first step that seems obvious to me is do not leave a full headspace of air in your bottles. If using PET bottles works for you, squeezing out the headspace appears to be quite effective. Using a CO2 source to purge the headspace also appears effective. I have read of people filling bottles to reduce or eliminate the headspace (though I feel like some headspace is useful to absorb pressure from expansion and contraction of the liquid with temperature changes).
I am not sure how much oxidation occurs when using a bottling bucket. My gut says that bottling directly from the fermenter will reduce oxidation, but a gentle transfer to a bucket, with a gentle mix of sugar solution and limiting the amount of time your beer sits in the bottling bucket is probably okay.
If you have gotten to packaging day with a non-oxidized beer, and you have a strategy to eliminate or reduce air in the bottle’s headspace, then it is probably worth thinking about the extras. I don’t have definitive proof or advice, but I have to think that anti-oxidants or oxygen absorbing bottle caps will help to reduce small amounts of oxygen.
Next Steps – Future Investigations
Moving forward, how should I attempt to avoid bottling oxidation or structure investigative batches to test this out?
- Better Base Beer: The next time I try to bottle a beer to evaluate oxidation impacts, I plan to start with a well-executed base beer. Neither the Pale Ale nor the Hazy Hop Sampler examples in this article were the greatest beers. I found that I did not really enjoy drinking a full bottle of either beer. I am planning to cycle back to my last successful NEIPA, but with an even lighter colored grain bill.
- Compare to Kegged Version: I also want to ensure that I have a kegged example to use as a basis of comparison. I have some concerns that all of these bottled beers had some impacts of oxidation. Brewing my first NEIPA back in early 2019 was motivation for me to dive into avoiding oxygen, purging kegs and closed transfers. I am pretty confident in my ability to keg a non-oxidized NEIPA.
- Anti-Oxidants: I also want to learn more about using potassium/sodium metabisulfite, and figure out how to measure the correct dose for a small batch. I have also read that metabisulfite combined with ascorbic acid is a potent combination for preventing oxidation.
- Combine Techniques: Using multiple techniques to avoid bottling oxidation might just be the key. I am not sure if I want to pick up a supply of squeezable PET bottles, but I could combine headspace purging with an anti-oxidant and with oxygen absorbing bottle caps. Purging the bottle before filling may also reduce oxidation.
Let me know if you have had successes (or failures) with attempts to avoid bottling oxidation with hoppy and hazy beers. I hope to cycle back to this topic in the Late Summer or Fall of 2021. So also let me know if you have ideas for me to try or ideas to improve my experiment. I did acquire a 6-pack of clear glass bottles that I can use in combination with the PET bottles.
I had awful trouble with oxidisation of happy beers in bottles. I addressed it by filling my beers as normal with a bottling wand and then filling the headspace to the brim (about 20ml) with a solution of 2g AA, half a Camden tablet and about 60g of sugar dissolved in about 250ml of warm water. This was for about a dozen 500ml bottles. Has worked perfectly, never had another issue with oxidisation. Recently a few brews have had a slight sulphur odour so I have greatly reduced the amount of Camden I have used to about a sixth of a tablet and no issues. It’s a quick and easy method and a much easier way of adding sugar than weighting it and adding it dry to each bottle.
Are you still thinking of circling back to this topic for further experiments? I found the results of this one really interesting. I would be curious about the use of ascorbic acid as another point of comparison. I currently have an extract batch of a black IPA bottle-conditioning, and I included a little ascorbic acid in a late dry hop addition (using the magnet technique) so I could dose the whole batch evenly without a bottling bucket. I was also going to purge the headspace of the bottles with an argon-based wine preserver (Private Preserve), as discussed in the homebrewtalk thread you linked, but I realized at the last minute that I was all out of Private Preserve. So we’ll see how that goes.
Speaking of purging with Private Preserve, I would love to see that option side-by-side with others as well to see how it compares to purging with CO2. I’m one of those folks who doesn’t have a CO2 tank.
Yes, this is something I have been wanting to focus on again. I have done a few mini-trials to play around with high filling bottles, adding Ascorbic Acid and Metabisulfite and also purging vs not purging. These have been in non non-hoppy beers where I have not yet noticed an impact.
I like your suggestion to use a product like Private Preserve. This would provide another potential solution for people that do not have a CO2 tank.